Listen along to ‘With You’ with the Spotify widget at the top of the page as you read.
It seems like it would be simple – one voice, one guitar.
How hard could it be?
But as every aspiring troubadour eventually finds out, recording and mixing acoustic guitar and vocals is surprisingly tricky.
If under-produced, it can sound like a cheap bedroom recording. If over-produced, you can lose the intimacy you were looking for when deciding to record solo acoustic.
I spent years searching for a folky, solo acoustic sound I was happy with but always ran into obstacles.
Was it the microphones I was using? The placement of the mics? The reverb? The plugins? How can I get a better solo acoustic mix?
I read tons of articles searching for help on how to record folk music. Mining TapeOp, Sound On Sound, and other resources for answers and production techniques. Each had different tips and tricks…some seemed to help, and some didn’t.
After a lot of experimenting and learning, I finally found a recording and mixing work flow that really works for me. So I thought I’d pay it forward and put together some recording notes on how I go about recording solo acoustic folk music.
A lot of articles on this topic give general tips that can work as best practices, but I never found these as instructive as actual detailed “recording notes” examples.
For that reason, I’ve decided to break down the recording notes of my song, With You, with the detailed setup and settings of my workflow and mixing process. Listen along as you read with the YouTube widget at the top of the page.
It’s important to note that those general articles are usually written in the broadest form because they don’t really know what sound you’re going for. Slick and polished will be totally different than vintage folk.
So, for reference, I was going for something in the singer-songwriter tradition somewhere between Freewheelin’ era Bob Dylan (Oxford Town, Girl from the North Country), After the Goldrush era Neil Young (Tell Me Why), Uncle Tupelo (Moonshiner, New Madrid), Golden Smog (Radio King, Please Tell My Brother), and The Gleam era Avett Brothers.
Gear & Recording Setup
My basic rig for With You was running a UA 2-610 through the UA Apollo into my Mac Book Pro. I rely mainly on UAD plugins for mixing.
For vocals, I sang into a Shure SM7. Condenser mics are frequently recommended for recording vocals, but the SM7 is a dynamic mic with a storied history as a vocal mic.
Dynamic mics like the SM7 (or SM57 or SM58) are particularly useful when recording vocals while playing guitar. A dynamic mic has better off axis sound rejection, which means you’ll have less of the guitar in your vocal mic which makes it easier to mix the vocal later on.
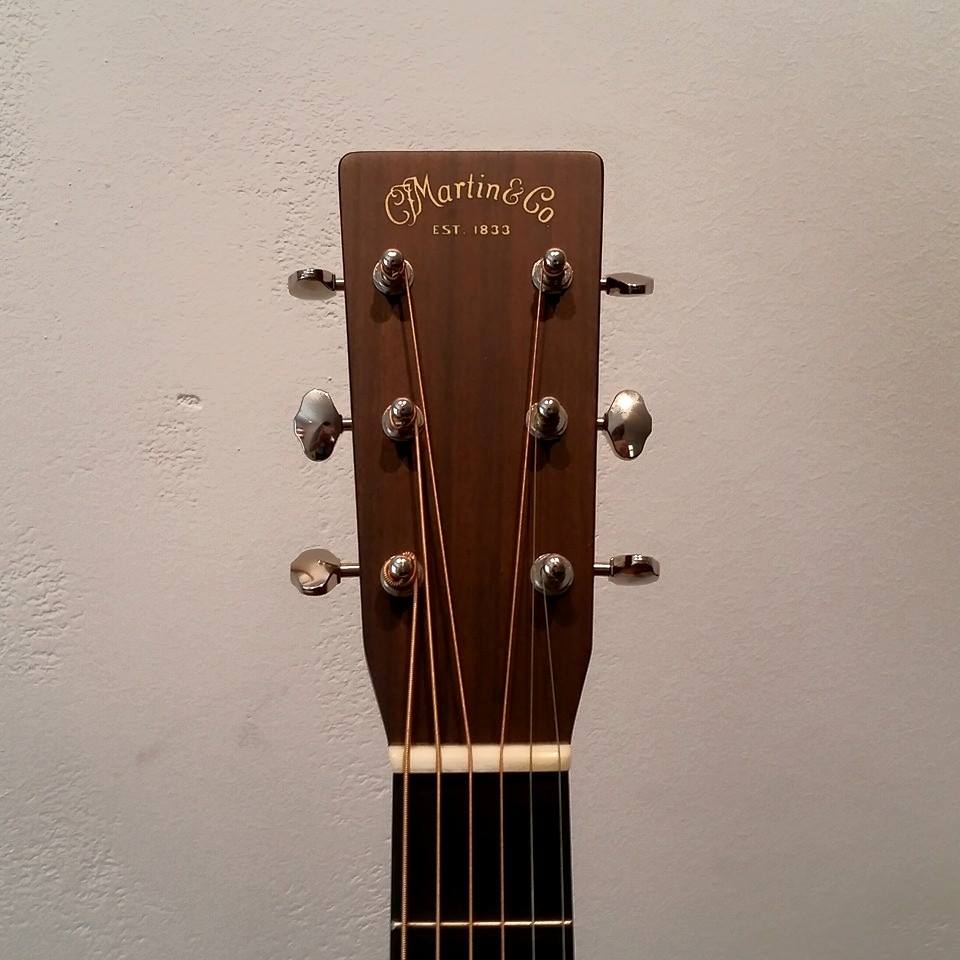
For guitar, I played my Martin HD-28V guitar into a pair of Octava MK-012s.
I’m not scientific about the placement, but I make sure I’m 18-24 inches away from all of the mics when playing. Any closer and I get a lot of low end frequencies that are hard to manage at the mixing stage, and the sound is too up front for my taste. I want there to be a little breathing room between the performer and the listener’s ear, and backing off the mics just a touch helps capture both the performer and some acoustics of the room.
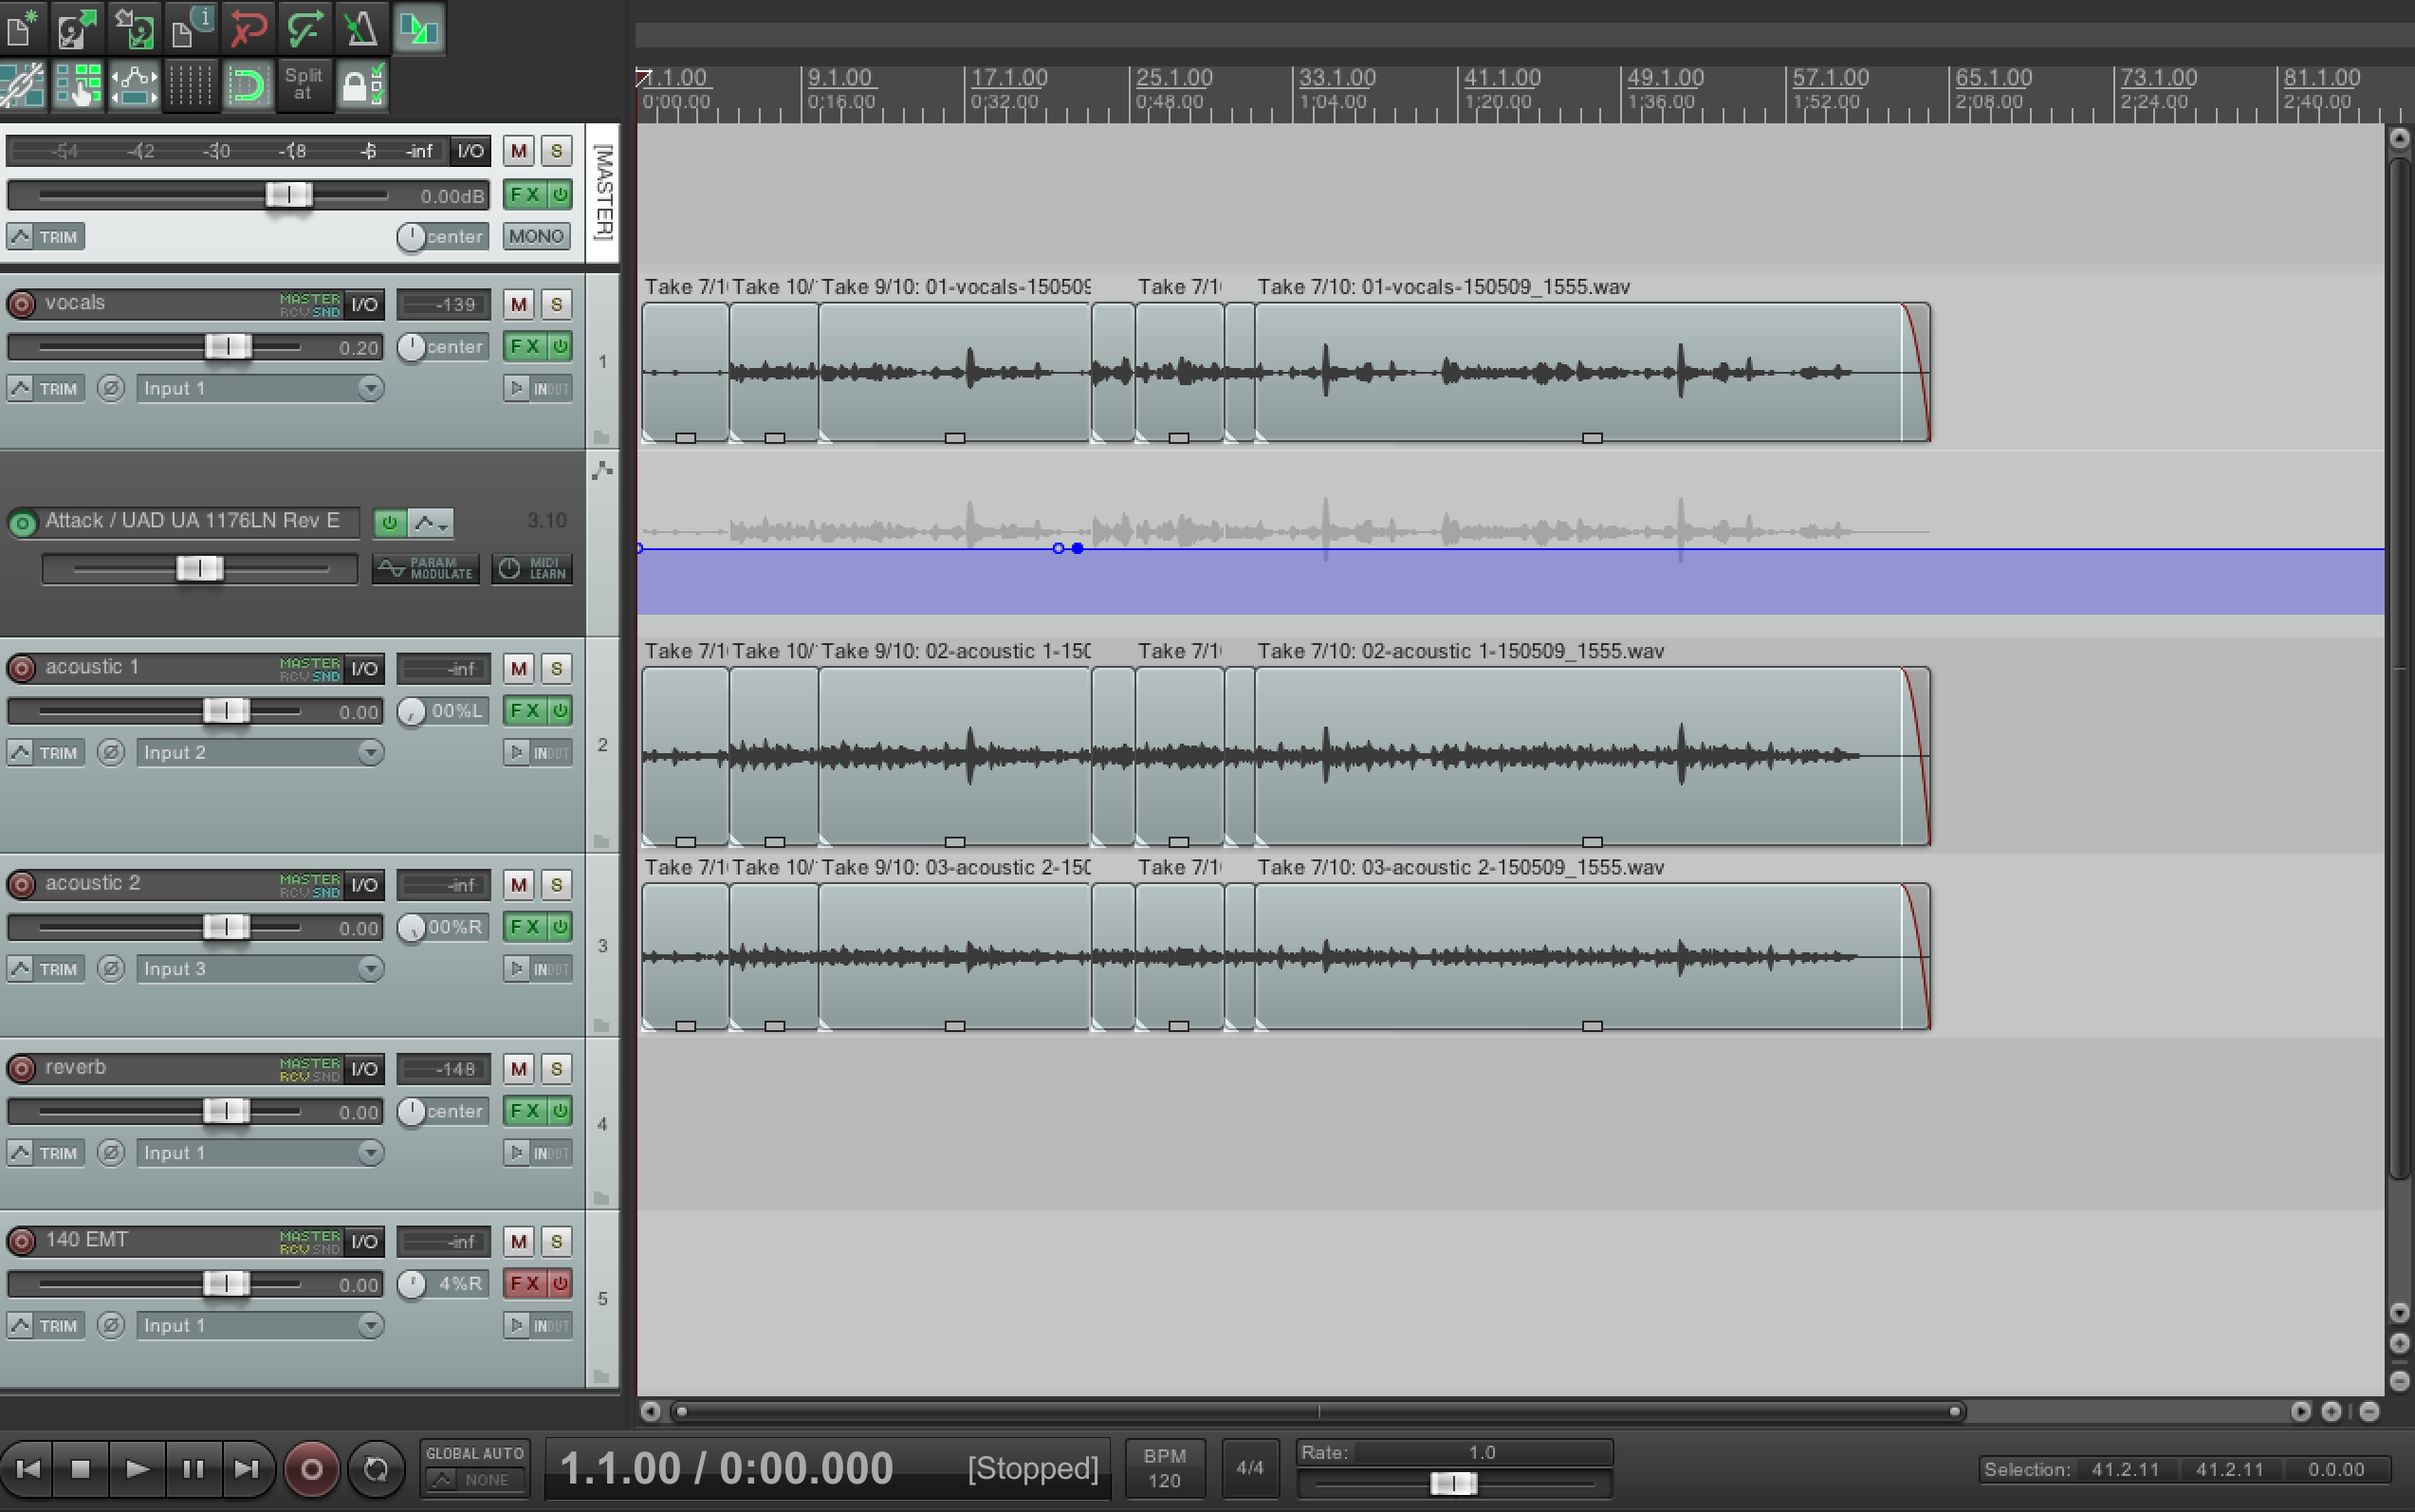
The last critical part of the recording setup is to play guitar and sing live at the same time – no overdubs. What you give up in mixing flexibility, you gain in ambience and feel.
Also, having all of the mics pick up the blend of vocals and guitar helps glue the mix together in a way that’s much more difficult to do when tracking vocals and guitar separately.
You can always record a few takes if you need to punch in an alternate phrase to piece together the perfect take. Most DAWs have grouping tools these days that makes edits across multiple tracks easier than ever.
Vocal Chain:
Shure SM7 microphone
UA 2-610 preamp
UAD LA-2A compressor
UAD Neve 88RS channel strip
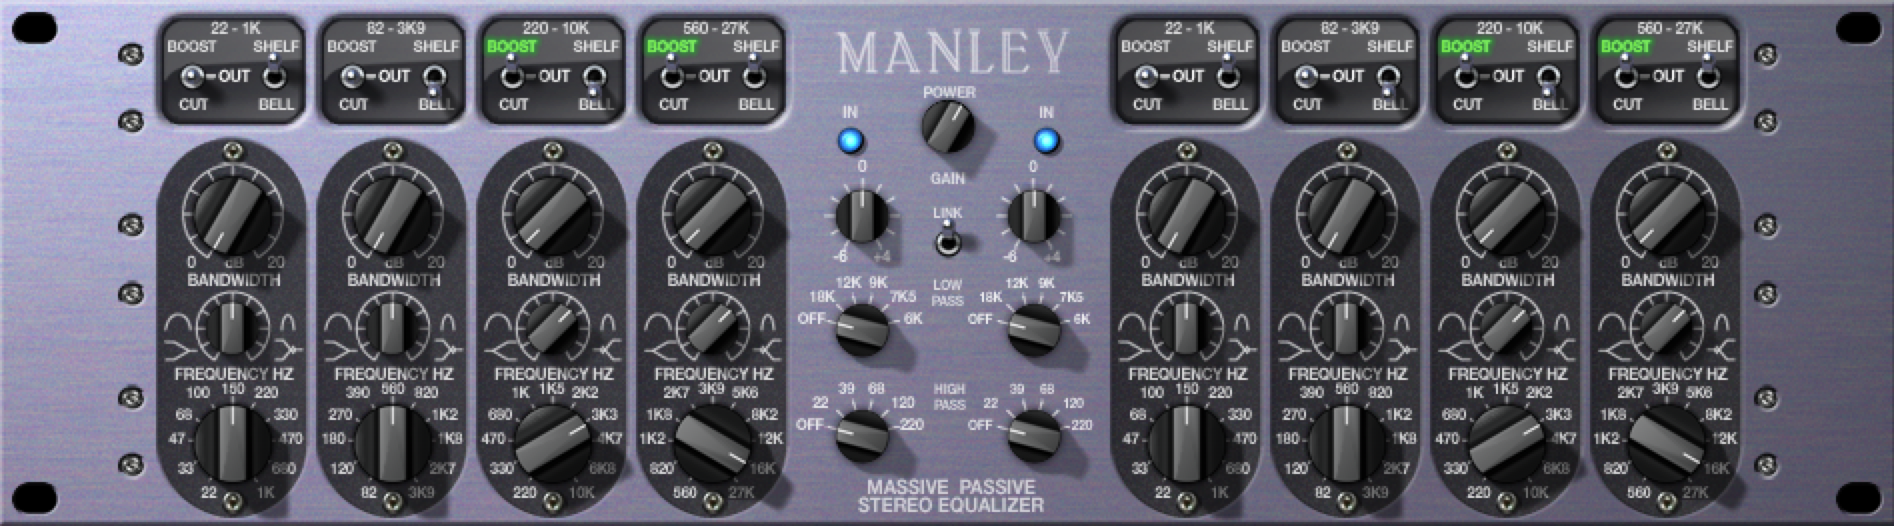
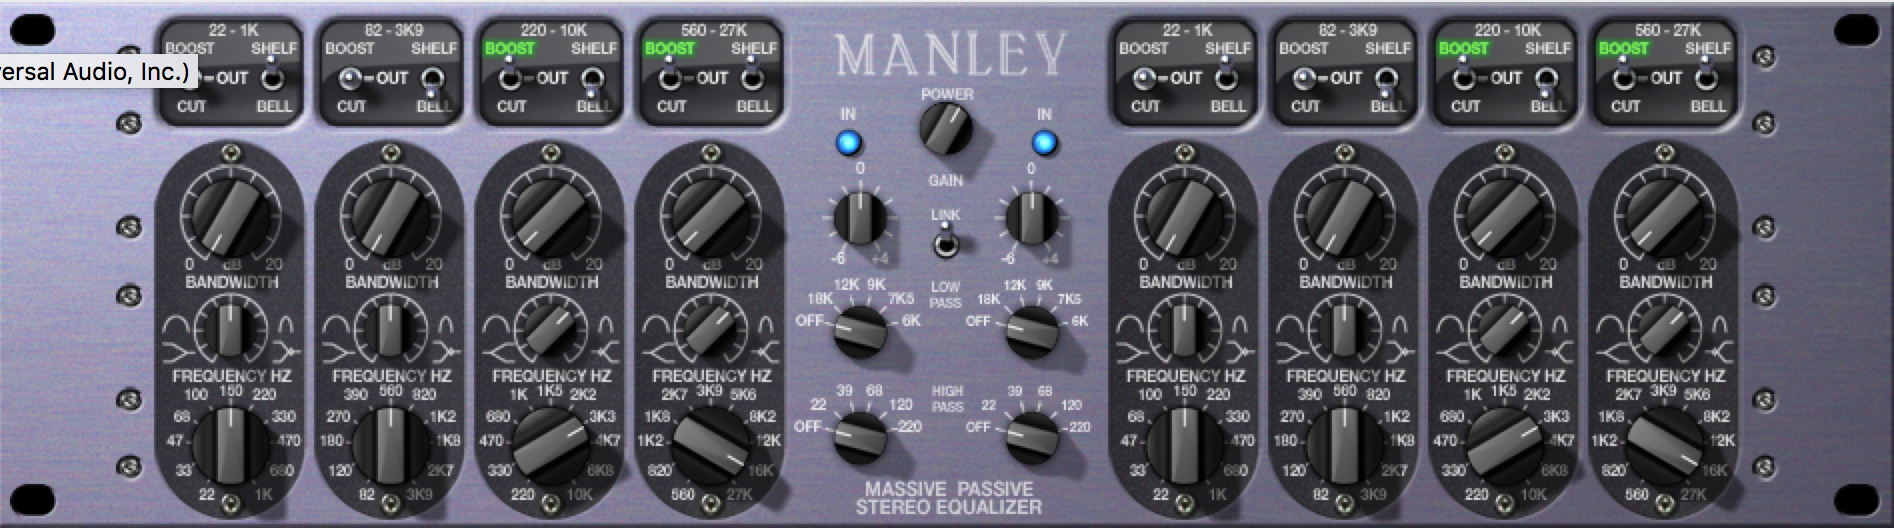
UAD ManleyMassive Passive EQ
UAD Precision DeEsser
When mixing, I always start with the vocal because that’s what will carry the emotion of the song and what listeners will key into first.
For mixing vocals, the LA-2A is my go to compressor.
I try to hit the gain reduction between 3-5db so that it smoothes out the vocal but leaves a lot of the dynamics intact.
For EQ, I actually use two different plug-ins, each for a different purpose.
For shaping the low end of the vocal and getting it to sit where I want in the mix, I use the Neve 88RS. I mainly use the high-pass filter because it gives such great flexibility of dialing in the specific frequency you need. On With You, I just rolled off under 50Hz.
Because I used a dynamic mic for the vocals, I needed to add some high end frequencies to give the vocal a little more top end, and I do that with the Manley Massive Passive. A little bell boost at 3K3 and a little shelf boost at 16K.
Lastly, I throw on a Precision De-Esser to tame and sibilance on the “esses”.
Acoustic Guitar Chain:
MK-012 microphones
UA2-610 preamp
UAD 1176LN Rev E compressor
Neve 88RS channel strip
One of the keys here is to record in stereo. Pan one mic hard left (100% L) and one mic hard right (100% R).
For whatever reason, I tend to favor the left side for being a little more prominent, so on the left track, I use a little compression from the 1176LN Rev E at a 4:1 ratio to balance out the acoustic guitar dynamics and then only use EQ to roll off some bottom end (about 80Hz with the 88RS on this track). This goes back to what I was saying earlier – it totally depends on what style you’re going for…but for folky acoustic guitar, I want it sounding natural, which means I applied almost no EQ aside from the low end cuts to get everything sitting together.
For the right track, it was even less work. Just rolled off the low end at 150Hz with an 88RS.
Again, I wanted the left channel to be a little more prominent and the right to really provide the stereo ambience, that’s why I was a little more heavy handed on the low cut.
Effects:
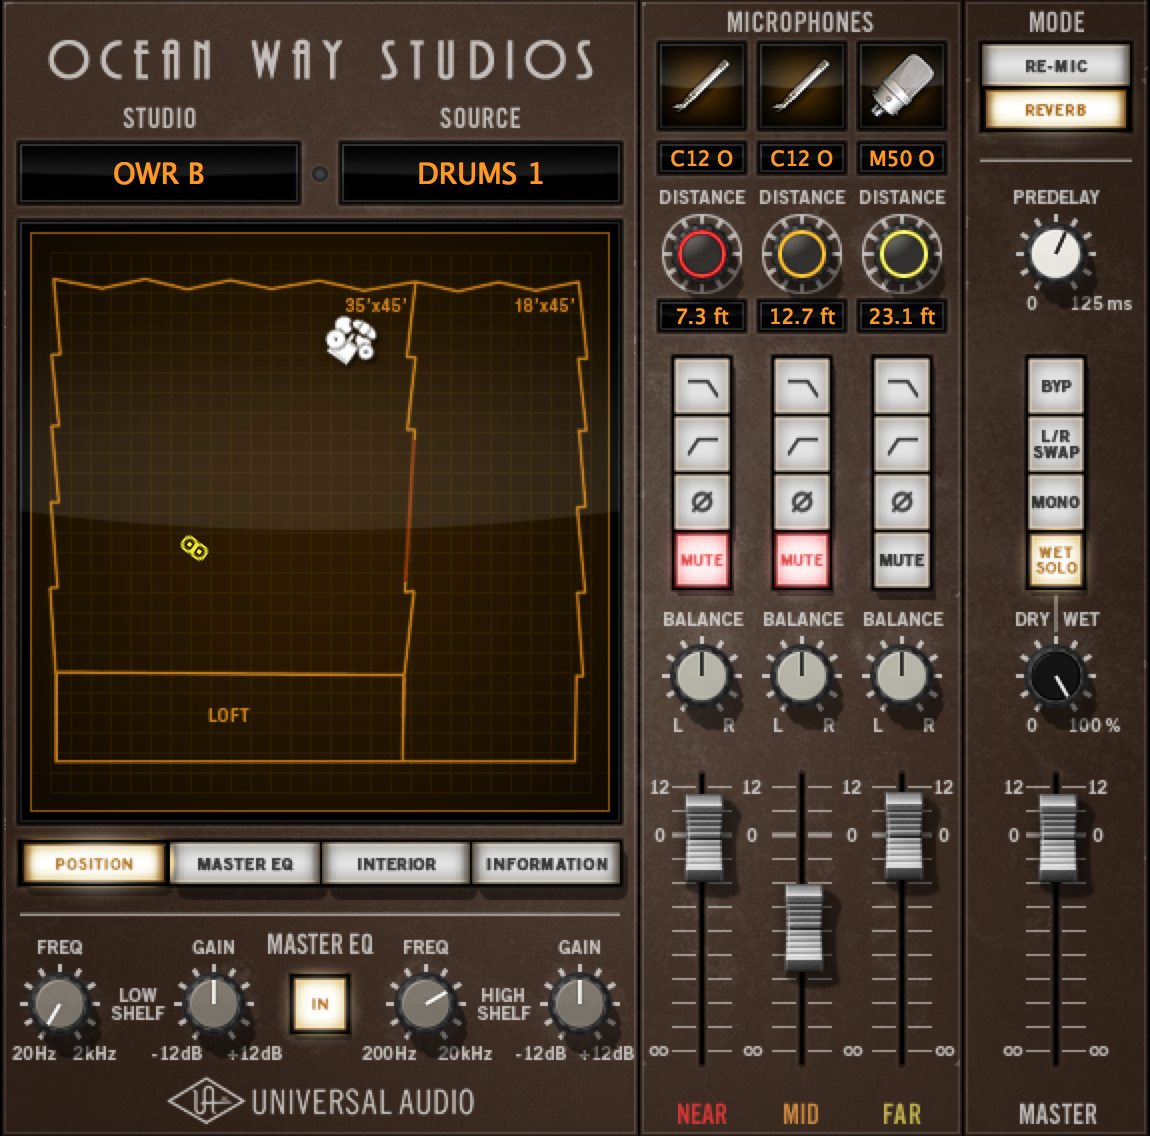
UAD Ocean Way Reverb
I usually use the EMT 140 on vocals, but for the solo acoustic sound, it wasn’t sounding natural enough, so I dropped it in favor of using the Ocean Way Studios reverb.
This plugin has cut my mixing time in half for almost everything I do. My biggest challenge recording and mixing in my small-ish / dry studio is getting a nice ambience back into my recordings (a little different than recording in the telephone sized booth at Jack White’s Third Man Records). In the past, that mean a mix of different reverbs and delays, but I feel like the Ocean Way plug does it better and faster.
So, I setup the Ocean Way as a bus effect because I send it to the vocal and both acoustic mics.
My favorite basic setting is the Room B Drums 1 room & mic setup. It has the most open sound to my ears. From there, I hit “Wet Solo” which is always best for bus effects. I ended up muting all of the mics except for the most distant mic (at 23.1 ft). To me, that gave it the most roomy/distant feel. If you’re looking for something more present, you can turn on the closer mics.
From there, I adjust the effects send into the Ocean Way from each track to taste – just enough that if you mute it you can tell a difference. I also did 1db more on the vocal mic than my acoustic, as I didn’t use any vocal reverb other than this.
Master Bus:
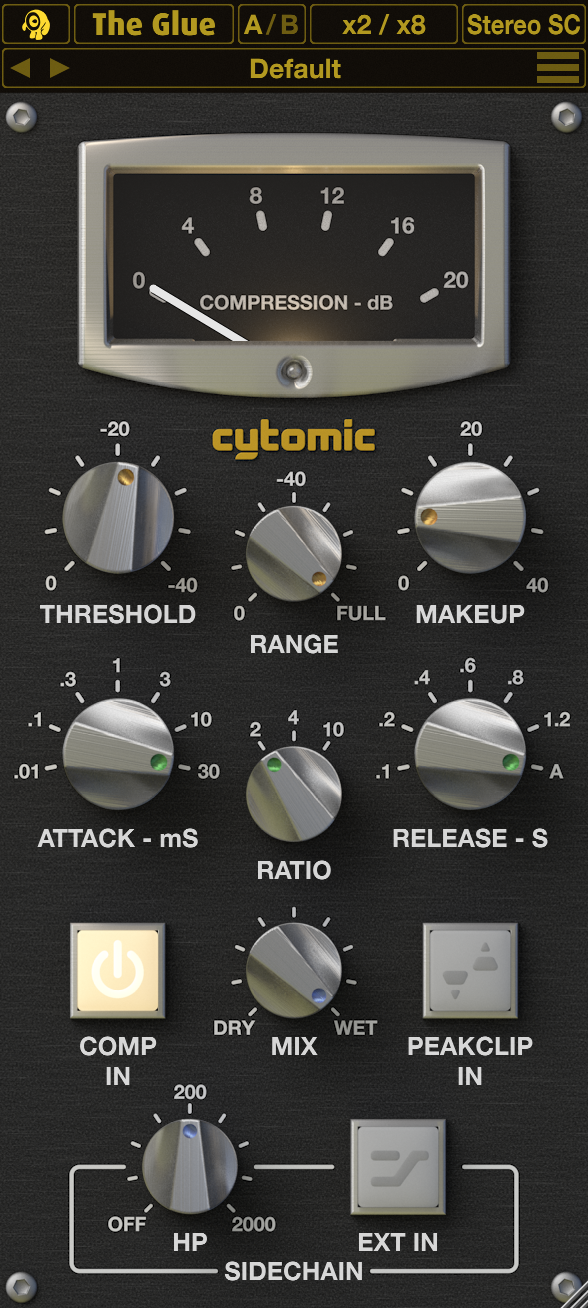
cytomic The Glue bus compressor
UAD Precision Equalizer
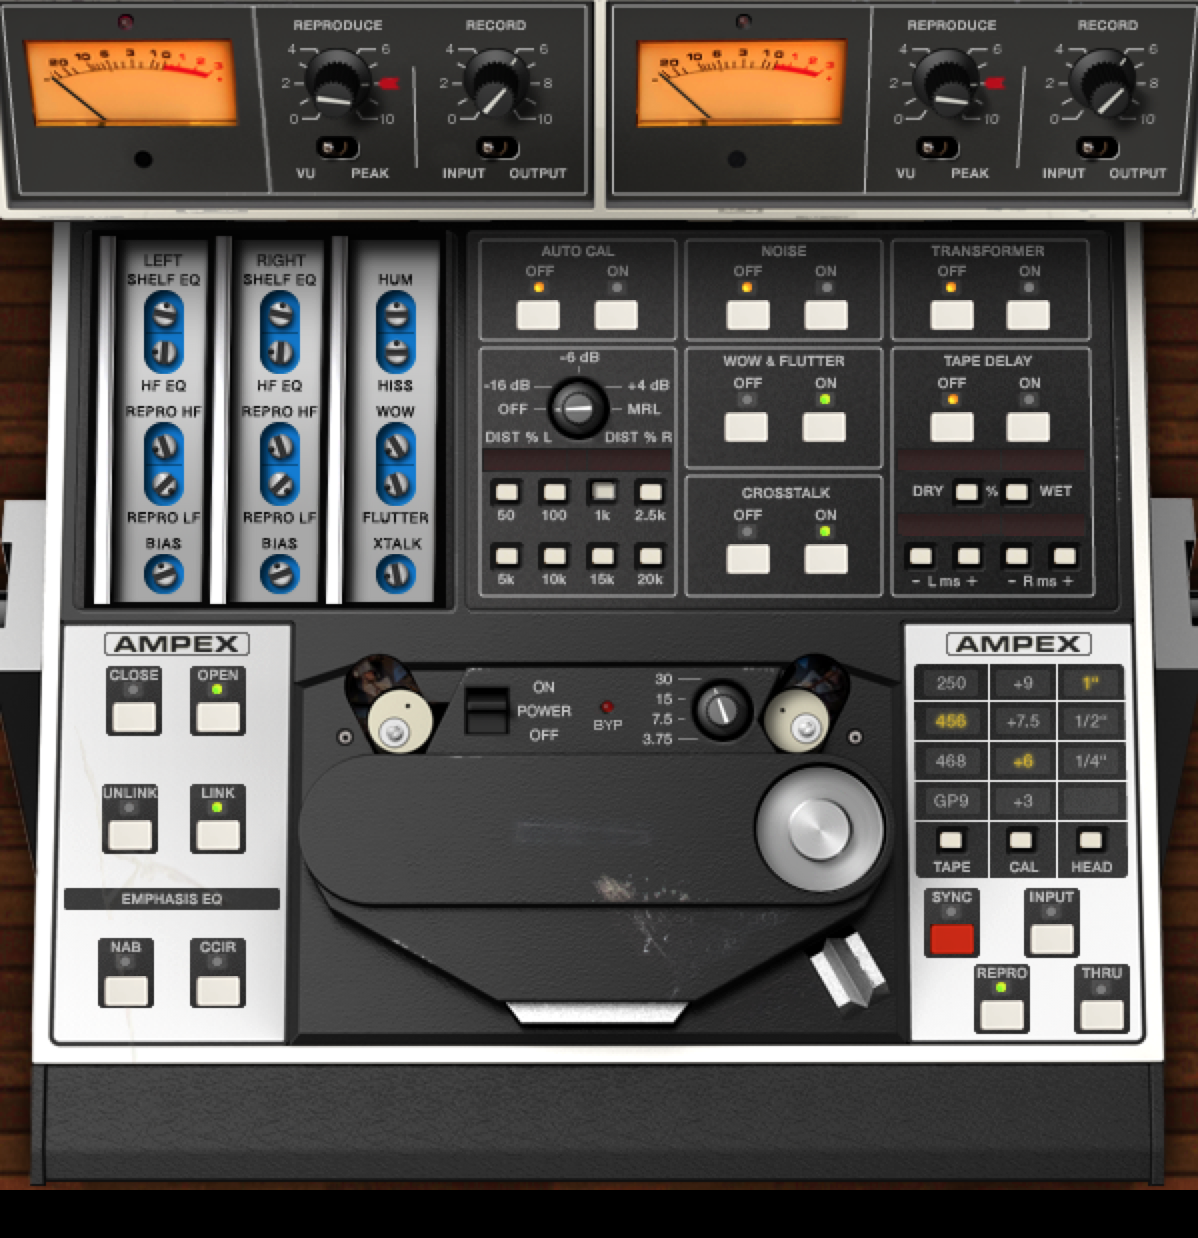
UAD AmpexATR-102
UAD Precision Limiter
The final steps of pulling together my mix takes place on the master bus.
Step one is always a bus compressor to smooth out the sound and give it that “record” feel.
My go-to here is always The Glue by cytomic. The reason it’s my favorite bus compressor is that it has an integrated high-pass filter, which can help compress the volume peaks on the top-end of your mix while keeping the low-end intact. I set the high-pass filter to 200Hz, ratio to 2:1, attack to 30ms, and release to Automatic.
Step two is EQ. Here I tread carefully with the Precision Equalizer. On this mix, I only did a high-pass filter at 20Hz. That’s it. On other mixes, I might make a few tweaks to balance out the low-end, but I prefer to do that at the track level.
Step three is to give it some analog tape sound. For that, I use the Ampex ATR-102. A few important things I always do here. The first is I start with one of the UAD Stephen Smith “Ultralinear” presets. They give it a nice analog feel without really shifting the EQ balance of my mix. Some of the other presets affect the mix balance too much, but the Ultralinear keeps that intact. I used the 456 30IPS setting for With You, and I turned off the transformer. I find it to be the most subtle. You can go to 15IPS if you want it to sound even more vintage.
The last step is doing a little final compression and bringing up the volume to a professional level with a little limiting.
For that, I use the Precision Limiter. All I do here is make sure I’m monitoring Peak-RMS, and then I dial up the dB until I’m averaging around -12db. That’ll get it sounding competitive volume-wise with most professional mixes out there (this is assuming you don’t send it to a Mastering House for final mastering, as they always prefer a version without limiting).
Layer On The Instruments
It’s important to note that this recording method isn’t just for solo acoustic. It can also serve as a great base track for a more “full band” sounding singer-songwriter record.
Once you have the live guitar and vocal track nailed, it’s much easier to add on other tracks.
The only real changes I make are that I mute one of the stereo guitar mics and pan the other mic closer to center so there’s a little more room in the stereo field, and I sometimes roll off just a little more low end to make room for a bass guitar.
From there, I can add on percussion, bass, keys, a mandolin…whatever helps add to the song.
I send all of the added instruments to the same reverb bus so that it sounds like they’re all in the same room.
I used this method for every track on my Road Signs EP along with my recording of Twinkle, Twinkle Litter Star where I added bass after recording guitar and vocals live.
Wrap Up
That’s it. Hope these tips help for mixing folk music and point you towards getting a better solo acoustic guitar and vocals sound going.
This is just what I used record my song With You, so you’ll need to adjust accordingly if you’re going for a different sound, but the general tools and approach should still be relevant. As Bob Ross would say, “You can do anything you want to do. This is your world.”
Questions & comments welcomed below.
Listen to more of my tunes on Spotify…


Thanks so much for this……I’ve been mixing for some friends’ and looking for the right kinda vibe, and I think you just provided the inspiration I need!
Beautiful song, by the way……..you had my eyes watering towards the end, you really did…
Thanks, once again…….Dan
Thank you, sir. Glad it was helpful…
Thanks very much for the info – just what I needed to fix up my mix – much appreciated 🙂
Adding Clarity – I’ve found that a high-pass filter at 1z leaves room for the kick drum and bass guitar in a mix while allowing the acoustic to shine at the higher frequencies.
Trying this out tonight on a new demo. Thanks!
Great songs Drew. Congratulations. I have to think they will be great successes!
Thanks, Joe.
If you plan on recording acoustic guitar or you play both acoustic and electric or you want to record vocals as well, you will need an audio interface that gives you multiple inputs. There are plenty of options if you want multiple inputs.
Indeed. I’m using Universal Audio’s Apollo unit.
Thank you. This is great. I just recorded a set of solo guitar + vox songs. Struggling a bit with the mix because everything is so exposed. No layers to hide behind. You do some stuff that I hadn’t thought of, so looking forward to trying it.
thank you very much for sharing this tutorial! great song, i will follow you on spotify
Thank you so much! I’m also a folk-singer/songwriter and was looking for some inspiration, for the most information I found on the internet was rather regarding rap, rock or pop songs. I like that song “With You”, keep going! Peace.